写在前面
医生说:“世界上看过最多绝望表情的应该是我了。”理发师:“呵呵。”
刚去理了个头发,40¥,内心绝望,回来安心码代码…
注册处理程序已经做完,接下来这一一完成其他路由。
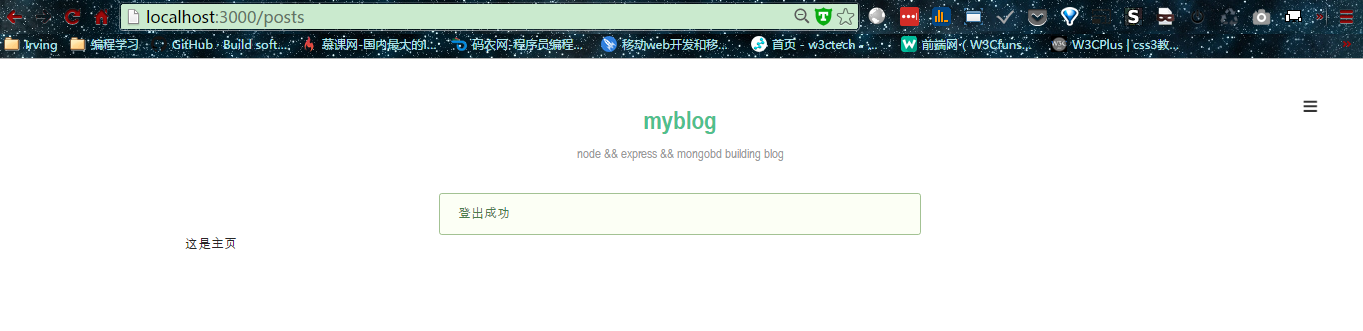
登出
修改routes/signout.js 如下:
var express = require('express');
var router = express.Router();

var checkLogin = require('../middlewares/check').checkLogin;

// GET /signout 登出
router.get('/', checkLogin, function(req, res, next) {
  // 清空 session 中用户信息
  req.session.user = null;
  req.flash('success', '登出成功');
  // 登出成功后跳转到主页
  res.redirect('/posts');
});

module.exports = router;
此时,我们点击右上角的登出按钮,我们退出了登录并重定向到主页:
登录
以上,我们完成了注册与登出,注册用户后,那么就需要提供用户登录的处理程序了。
在views/目录下新建signin.ejs页面。修改models/users.js添加getUserByName方法用于通过用户名获取用户信息:
// users.js
var User = require('../lib/mongo').User;

module.exports = {
  // 注册一个用户
  create: function create(user) {
    return User.create(user).exec();
  },

  // 通过用户名获取用户信息
  getUserByName: function getUserByName(name) {
    return User
      .findOne({ name: name })
      .addCreatedAt()
      .exec();
  }
};
随后修改lib目录下的mongo.js,代码如下:
// mongo.js
var config = require('config-lite');
var Mongolass = require('mongolass');
var mongolass = new Mongolass();

var moment = require('moment');
var objectIdToTimestamp = require('objectid-to-timestamp');
mongolass.connect(config.mongodb);


// 根据 id 生成创建时间 created_at
mongolass.plugin('addCreatedAt', {
  afterFind: function (results) {
    results.forEach(function (item) {
      item.created_at = moment(objectIdToTimestamp(item._id)).format('YYYY-MM-DD HH:mm');
    });
    return results;
  },
  afterFindOne: function (result) {
    if (result) {
      result.created_at = moment(objectIdToTimestamp(result._id)).format('YYYY-MM-DD HH:mm');
    }
    return result;
  }
});

exports.User = mongolass.model('User', {
  name: { type: 'string' },
  password: { type: 'string' },
  avatar: { type: 'string' },
  gender: { type: 'string', enum: ['m', 'f', 'x'] },
  bio: { type: 'string' }
});
// 根据用户名找到用户,用户名全局唯一
exports.User.index({ name: 1 }, { unique: true }).exec();
修改routes/signin.js文件,添加用户登录处理程序,其代码如下:
// routes/signin.js
// version $1.0.1$
var sha1 = require('sha1');
var express = require('express');
var router = express.Router();
var UserModel = require('../models/users');
var checkNotLogin = require('../middlewares/check').checkNotLogin;
// GET /signin 登录页
router.get('/', checkNotLogin, function(req, res, next) {
res.render('signin');
});
// POST /signin 用户登录
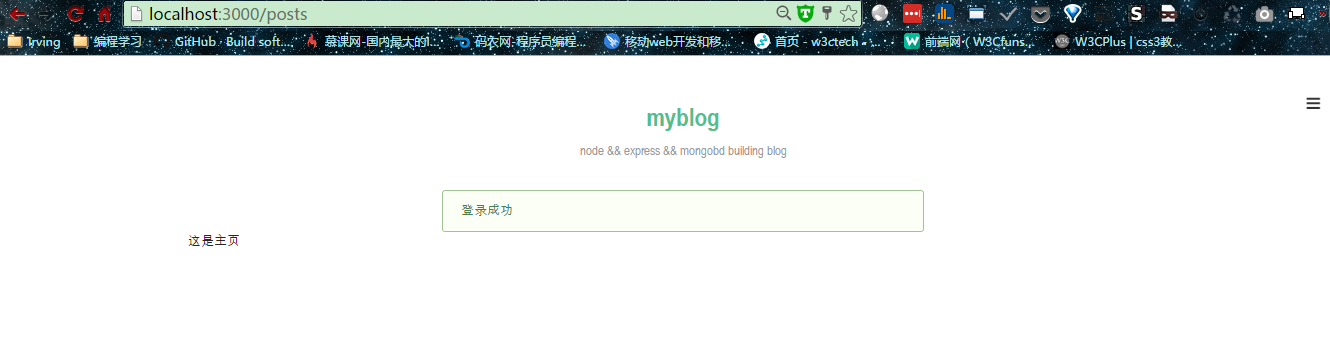
router.post('/', checkNotLogin, function(req, res, next) {
var name = req.fields.name;
var password = req.fields.password;
UserModel.getUserByName(name)
.then(function (user) {
if (!user) {
req.flash('error', '用户不存在');
return res.redirect('back');
}
// 检查密码是否匹配
if (sha1(password) !== user.password) {
req.flash('error', '用户名或密码错误');
return res.redirect('back');
}
req.flash('success', '登录成功');
// 用户信息写入 session
delete user.password;
req.session.user = user;
// 跳转到主页
res.redirect('/posts');
})
.catch(next);
});
module.exports = router;
此时访问localhost:3000/signin,用之前注册的用户登录:
文章
至此,我们已经完整了用户创建到登录部分的功能,当用户登录后,我们为用户提供发布文章的功能。
我们将用户发表的文章存储到数据库,保存文章时我们只存储文章的作者id、标题、正文和点击量这几个字段,对应地,我们修改lib/目录下的mongo.js,添加如下代码:
exports.Post = mongolass.model('Post', {
  author: { type: Mongolass.Types.ObjectId },
  title: { type: 'string' },
  content: { type: 'string' },
  pv: { type: 'number' }
});
// 按创建时间降序查看用户的文章列表
exports.Post.index({ author: 1, _id: -1 }).exec();
我们尚未提供发布文章的前端页面,接下来实现它,在views/目录下新建create.ejs文件,用于存放发布文章的页面代码。同时,在models/目录下新建posts.js文件用来存放与文章操作相关的代码:
var Post = require('../lib/mongo').Post;

module.exports = {
  // 创建一篇文章
  create: function create(post) {
    return Post.create(post).exec();
  }
};
修改routes/posts.js,在文件上方引入PostModel:
var PostModel = require('../models/posts');
修改发表文章的处理程序代码如下:
// POST /posts 发表一篇文章
router.post('/', checkLogin, function(req, res, next) {
  var author = req.session.user._id;
  var title = req.fields.title;
  var content = req.fields.content;

  // 校验参数
  try {
    if (!title.length) {
      throw new Error('请填写标题');
    }
    if (!content.length) {
      throw new Error('请填写内容');
    }
  } catch (e) {
    req.flash('error', e.message);
    return res.redirect('back');
  }

  var post = {
    author: author,
    title: title,
    content: content,
    pv: 0
  };

  PostModel.create(post)
    .then(function (result) {
      // 此 post 是插入 mongodb 后的值,包含 _id
      post = result.ops[0];
      req.flash('success', '发表成功');
      // 发表成功后跳转到该文章页
      res.redirect(`/posts/${post._id}`);
    })
    .catch(next);
});

// GET /posts/create 发表文章

router.get('/create',checkLogin,function(req,res,next){
    // res.send(req.flash());
    res.render('create');
});
此时访问,localhost:3000/posts/create。
发表成功后跳转到了文章页但并没有任何内容,下面我们就来实现文章页及主页用来展示用户所发布的文章。
主页与文章页
实现主页以及文章展示页面,修改models/posts.js代码如下:
var marked = require('marked');
var Post = require('../lib/mongo').Post;

// 将 post 的 content 从 markdown 转换成 html
Post.plugin('contentToHtml', {
  afterFind: function (posts) {
    return posts.map(function (post) {
      post.content = marked(post.content);
      return post;
    });
  },
  afterFindOne: function (post) {
    if (post) {
      post.content = marked(post.content);
    }
    return post;
  }
});

module.exports = {
  // 创建一篇文章
  create: function create(post) {
    return Post.create(post).exec();
  },

  // 通过文章 id 获取一篇文章
  getPostById: function getPostById(postId) {
    return Post
      .findOne({ _id: postId })
      .populate({ path: 'author', model: 'User' })
      .addCreatedAt()
      .contentToHtml()
      .exec();
  },

  // 按创建时间降序获取所有用户文章或者某个特定用户的所有文章
  getPosts: function getPosts(author) {
    var query = {};
    if (author) {
      query.author = author;
    }
    return Post
      .find(query)
      .populate({ path: 'author', model: 'User' })
      .sort({ _id: -1 })
      .addCreatedAt()
      .contentToHtml()
      .exec();
  },

  // 通过文章 id 给 pv 加 1
  incPv: function incPv(postId) {
    return Post
      .update({ _id: postId }, { $inc: { pv: 1 } })
      .exec();
  }
};
1.我们使用了markdown解析文章的内容,所以在发表文章的时候可使用markdown 语法(如插入链接、图片等等)。具体请另行google咯。
2.我们在PostModel上注册了contentToHtml,而addCreatedAt是在lib/mongo.js中的上注册的。
我们需将主页渲染出来,完成主页模板布局,修改views/posts.ejs如下:
<%- include(‘header’) %>
<% posts.forEach(function (post) { %> <%- include(‘components/post-content’, { post: post }) %> <% }) %>
<%- include(‘footer’) %>
在views/components/目录下新建post-content.ejs组件,用来存放单篇文章的模板片段:
随后修改routes/posts.js文件,修改代码如下:
router.get(‘/’, function(req, res, next) { var author = req.query.author;
PostModel.getPosts(author)
  .then(function (posts) {
    res.render('posts', {
      posts: posts
    });
  })
  .catch(next);   });
终于完成了主页与用户页,访问http://localhost:3000/posts试试吧,尝试点击用户的头像看看效果:
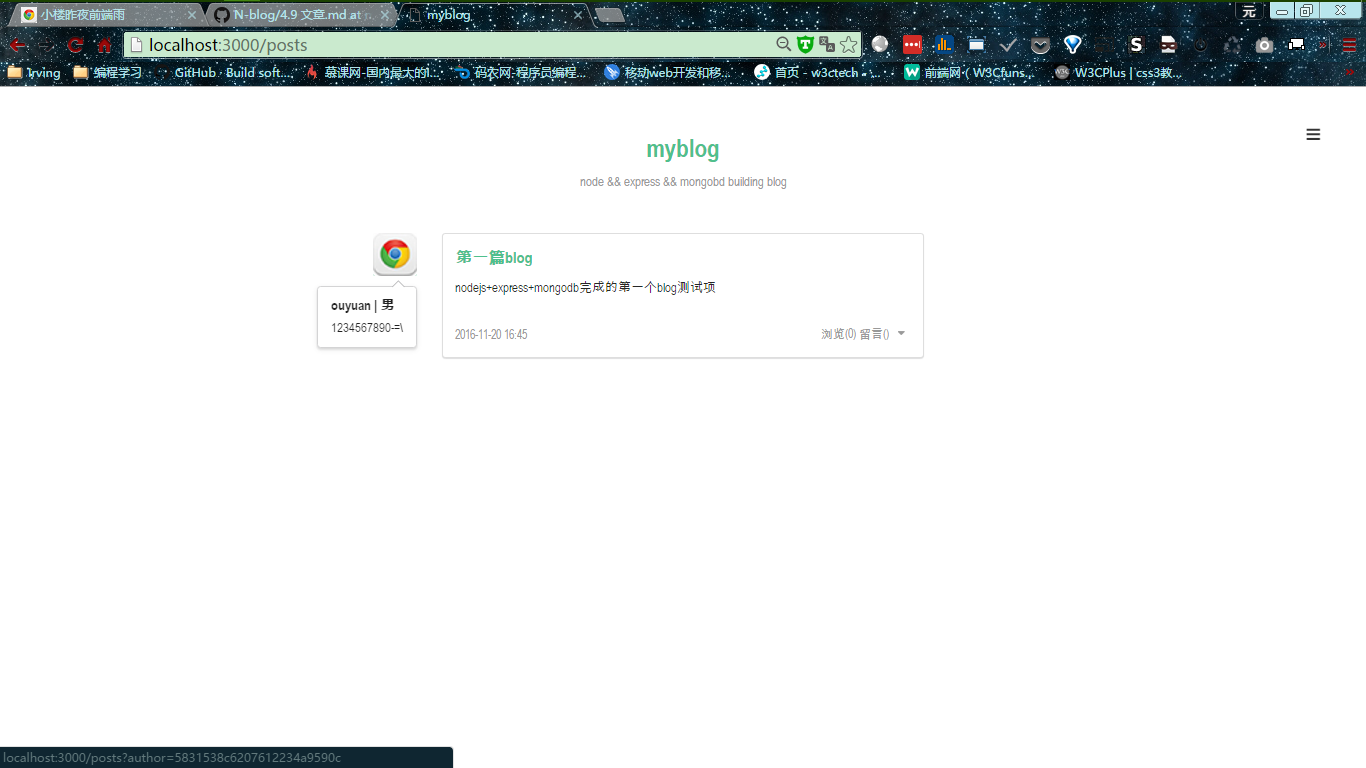
我们可以看到用户发表的文章,点击用户头像可以查看用户的相关信息!
接下来完成文章页。新建views/post.ejs,用于展示文章列表,在这里存放了用户发布的每一篇文章。修改相应的路由,修改routes/posts.js代码如下:
// GET /posts/:postId 单独一篇的文章页 router.get(‘/:postId’, function(req, res, next) { var postId = req.params.postId;
Promise.all([
  PostModel.getPostById(postId),// 获取文章信息
  PostModel.incPv(postId)// pv 加 1
])
.then(function (result) {
  var post = result[0];
  if (!post) {
    throw new Error('该文章不存在');
  }

  res.render('post', {
    post: post
  });
})
.catch(next);   });
此时,刷新浏览器,点击该文章的标题,浏览器地址栏的地址发生了变化!
编辑与删除文章
刚刚发布的文章,我并不满意,所以我想重新编辑它,或者索性删除它!
修改models/posts.js,在module.exports对象上添加如下3个方法:
// 通过文章 id 获取一篇原生文章(编辑文章) getRawPostById: function getRawPostById(postId) { return Post .findOne({ _id: postId }) .populate({ path: ‘author’, model: ‘User’ }) .exec(); },
// 通过用户 id 和文章 id 更新一篇文章 updatePostById: function updatePostById(postId, author, data) { return Post.update({ author: author, _id: postId }, { $set: data }).exec(); },
// 通过用户 id 和文章 id 删除一篇文章 delPostById: function delPostById(postId, author) { return Post.remove({ author: author, _id: postId}).exec(); }
在views/目录下新建编辑文章页edit.ejs。修改对应的路由,修改routes/posts.js文件:
// GET /posts/:postId/edit 更新文章页 router.get(‘/:postId/edit’, checkLogin, function(req, res, next) { var postId = req.params.postId; var author = req.session.user._id;
PostModel.getRawPostById(postId)
  .then(function (post) {
    if (!post) {
      throw new Error('该文章不存在');
    }
    if (author.toString() !== post.author._id.toString()) {
      throw new Error('权限不足');
    }
    res.render('edit', {
      post: post
    });
  })
  .catch(next);   });
// POST /posts/:postId/edit 更新一篇文章 router.post(‘/:postId/edit’, checkLogin, function(req, res, next) { var postId = req.params.postId; var author = req.session.user._id; var title = req.fields.title; var content = req.fields.content;
PostModel.updatePostById(postId, author, { title: title, content: content })
  .then(function () {
    req.flash('success', '编辑文章成功');
    // 编辑成功后跳转到上一页
    res.redirect(`/posts/${postId}`);
  })
  .catch(next);   });
// GET /posts/:postId/remove 删除一篇文章 router.get(‘/:postId/remove’, checkLogin, function(req, res, next) { var postId = req.params.postId; var author = req.session.user._id;
PostModel.delPostById(postId, author)
.then(function () {
req.flash('success', '删除文章成功');
// 删除成功后跳转到主页
res.redirect('/posts');
})
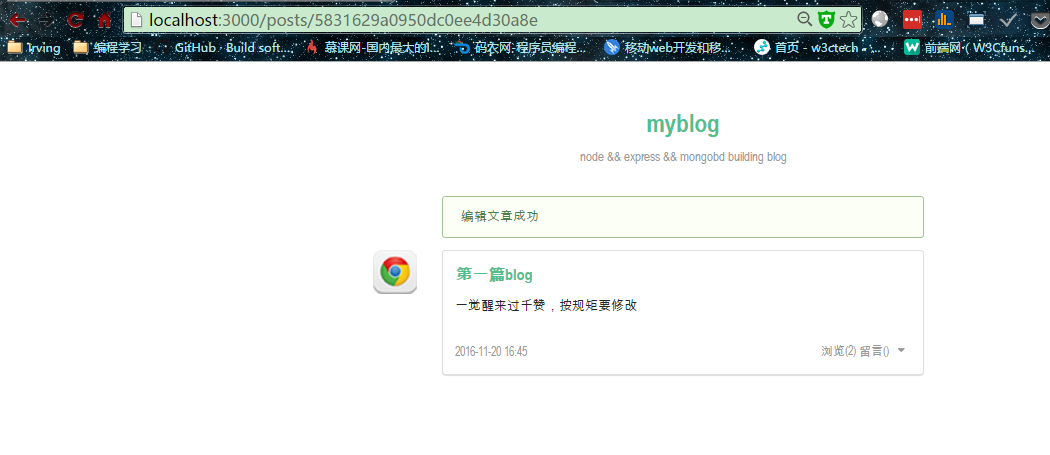
.catch(next); }); 现在刷新主页,点击文章右下角的小三角,编辑文章和删除文章试试吧:
留言
发表一篇文章,是用来与大家交流的,那么给文章留言就是最好的交流方式。
对于留言,我们只需要留言的作者id、留言内容和关联的文章id这几个字段,修改lib/mongo.js,添加如下代码:
exports.Comment = mongolass.model(‘Comment’, { author: { type: Mongolass.Types.ObjectId }, content: { type: ‘string’ }, postId: { type: Mongolass.Types.ObjectId } }); // 通过文章 id 获取该文章下所有留言,按留言创建时间升序 exports.Post.index({ postId: 1, _id: 1 }).exec(); // 通过用户 id 和留言 id 删除一个留言 exports.Post.index({ author: 1, _id: 1 }).exec();
在实现留言功能之前,我们先让文章页可以显示留言列表。首先创建留言的模板,新建 views/components/comments.ejs。在文章页引入留言的模板片段,修改views/post.ejs 为:
<%- include(‘header’) %>
<%- include(‘components/post-content’) %> <%- include(‘components/comments’) %>
<%- include(‘footer’) %>
在models/目录下新建comments.js用于存放评论相关的代码,添加如下代码:
var marked = require(‘marked’); var Comment = require(‘../lib/mongo’).Comment;
// 将 comment 的 content 从 markdown 转换成 html Comment.plugin(‘contentToHtml’, { afterFind: function (comments) { return comments.map(function (comment) { comment.content = marked(comment.content); return comment; }); } });
module.exports = { // 创建一个留言 create: function create(comment) { return Comment.create(comment).exec(); },
// 通过用户 id 和留言 id 删除一个留言
delCommentById: function delCommentById(commentId, author) {
  return Comment.remove({ author: author, _id: commentId }).exec();
},

// 通过文章 id 获取该文章下所有留言,按留言创建时间升序
getComments: function getComments(postId) {
  return Comment
    .find({ postId: postId })
    .populate({ path: 'author', model: 'User' })
    .sort({ _id: 1 })
    .addCreatedAt()
    .contentToHtml()
    .exec();
},

// 通过文章 id 获取该文章下留言数
getCommentsCount: function getCommentsCount(postId) {
  return Comment.count({ postId: postId }).exec();
}   };
随后在getPostById和getPosts方法中的addCreatedAt()后均加入addCommentsCount(),以在文章页和主页想显示评论内容。
TIPS:我们在评论中也支持了markdown
修改models/posts.js,在:
var Post = require(‘../lib/mongo’).Post;
下添加如下代码:
var CommentModel = require(‘./comments’);
// 给 post 添加留言数 commentsCount Post.plugin(‘addCommentsCount’, { afterFind: function (posts) { return Promise.all(posts.map(function (post) { return CommentModel.getCommentsCount(post._id).then(function (commentsCount) { post.commentsCount = commentsCount; return post; }); })); }, afterFindOne: function (post) { if (post) { return CommentModel.getCommentsCount(post._id).then(function (count) { post.commentsCount = count; return post; }); } return post; } });
修改routes/posts.js,在:
var PostModel = require(‘../models/posts’);
下引入CommentModel:
var CommentModel = require(‘../models/comments’);
修改routes/posts.js路由,把评论列表表插入到文章中:
// GET /posts/:postId 单独一篇的文章页 router.get(‘/:postId’, function(req, res, next) { var postId = req.params.postId;
Promise.all([
  PostModel.getPostById(postId),// 获取文章信息
  CommentModel.getComments(postId),// 获取该文章所有留言
  PostModel.incPv(postId)// pv 加 1
])
.then(function (result) {
  var post = result[0];
  var comments = result[1];
  if (!post) {
    throw new Error('该文章不存在');
  }

  res.render('post', {
    post: post,
    comments: comments
  });
})
.catch(next);   });
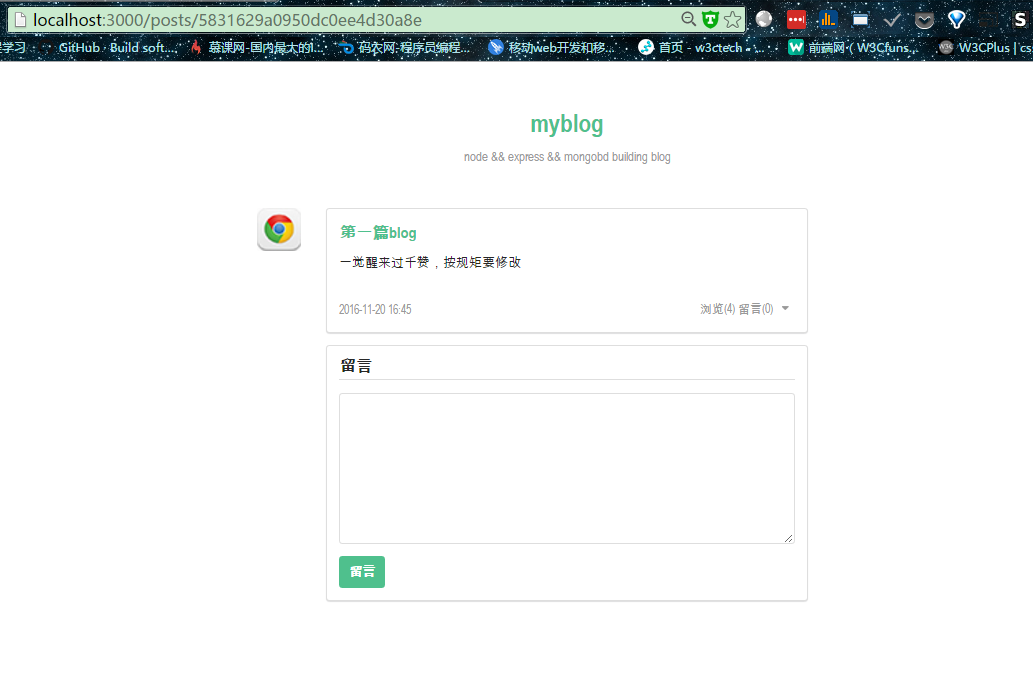
刷新浏览器,我们可以看到评论框已经被插入到文章中:
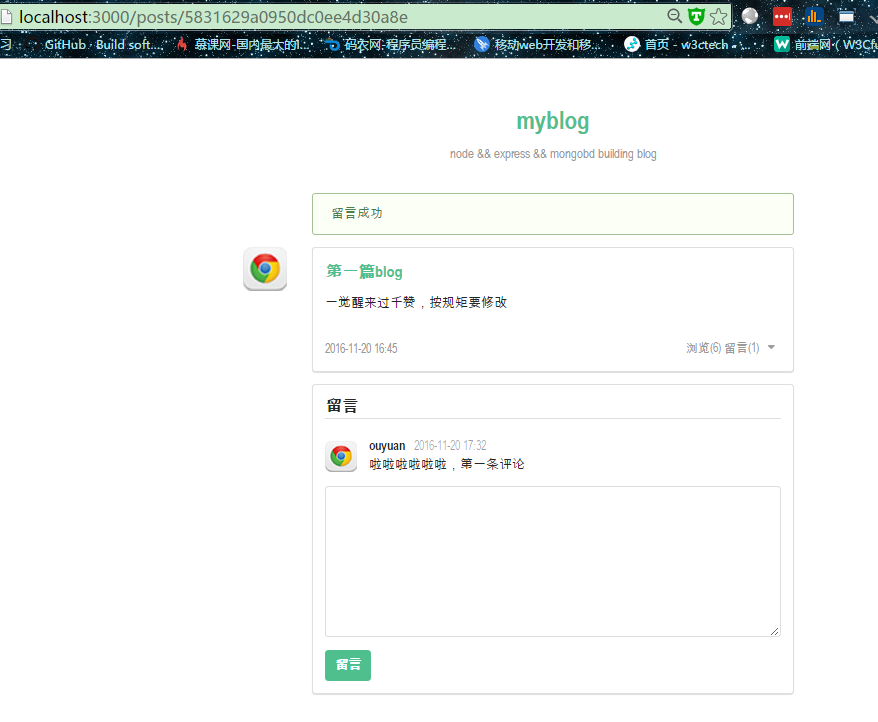
但此时若是点击发表评论,返回值将是一个空对象,因为我们尚未实现发表评论的处理程序。 那么,来实现它。
修改routes/posts.js:
// POST /posts/:postId/comment 创建一条留言 router.post(‘/:postId/comment’, checkLogin, function(req, res, next) { var author = req.session.user._id; var postId = req.params.postId; var content = req.fields.content; var comment = { author: author, postId: postId, content: content };
CommentModel.create(comment)
  .then(function () {
    req.flash('success', '留言成功');
    // 留言成功后跳转到上一页
    res.redirect('back');
  })
  .catch(next);   });
// GET /posts/:postId/comment/:commentId/remove 删除一条留言 router.get(‘/:postId/comment/:commentId/remove’, checkLogin, function(req, res, next) { var commentId = req.params.commentId; var author = req.session.user._id;
CommentModel.delCommentById(commentId, author)
  .then(function () {
    req.flash('success', '删除留言成功');
    // 删除成功后跳转到上一页
    res.redirect('back');
  })
  .catch(next);   });
刷新浏览器,来一波: